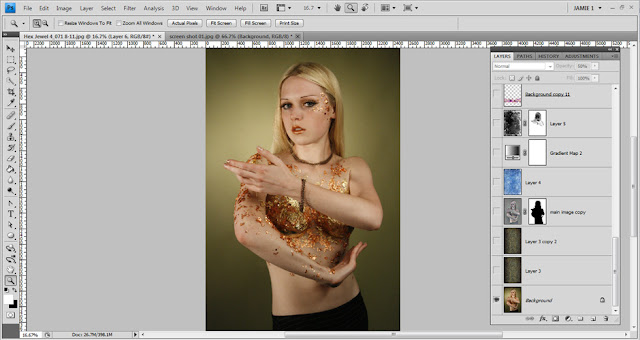
An exploration of how I created this image in photoshop.
This image was built up very gradually with lots of layers, I will attempt to describe each one from top to bottom...
Background texture...
1. Original file, Some mild skin retouching.
2. Texture, granitte surface, set to soft light, oppacity 100%
3. Texture, granite surface, set to Overlay, oppacity 25%
4. Copy of original file with high pass filter applied, set to overlay, oppacity 78% with a mask to take out the model. (this creates a subtle glow around the models head and shoulders)
5. texture, rough blue stone, set to softlight, oppacity 100%
6. B&W Gradient map, opacity 45%
7. B&W grungy texture, soft light, opacity 14%
These create the basic background texture....
Background flowers...
8-11..
I chopped out 3-4 images of lilly's, dulplicated and resized them several times to arrange in a row. Then applied a hue/saturation layer to make to colours uniform. Flattened this into one layer and then duplicated 4 times. each of these layes were then flipped and resized to make them look different. I then applied different blend modes and oppacity's to make them fade into the background.
I chopped out 3-4 images of lilly's, dulplicated and resized them several times to arrange in a row. Then applied a hue/saturation layer to make to colours uniform. Flattened this into one layer and then duplicated 4 times. each of these layes were then flipped and resized to make them look different. I then applied different blend modes and oppacity's to make them fade into the background.
Add some clarity...
12. Duplicate original file and masked out everything but the models head and shoulders then applied an outer glow.
13. Duplicated original file and chopped out the model then attached a B&W gradient map, opacity 26%
14. levels layer, highlights and shadows sliders brough in a touch ( 5 / 1.00 / 241 ) to increase contrast, oppacity 60%
13. Duplicated original file and chopped out the model then attached a B&W gradient map, opacity 26%
14. levels layer, highlights and shadows sliders brough in a touch ( 5 / 1.00 / 241 ) to increase contrast, oppacity 60%
So
now we have a nice textured background with flowers receding into it
and a clean cutout of the model on top....
Foreground flowers...
15. Duplicate one of the flower layers (8-11) and applied a gaussian blur.
16. Duplicate another flower layer, opacity 92% with the following layers attached in a stack...
16. Duplicate another flower layer, opacity 92% with the following layers attached in a stack...
17. Gradite texture layer, soft light
18. B&W Gradient map, opacity 50%
19. B&W Grunge texture, soft light, Opacity 70%
20. Levels layer ( 60 / 1.42 / 255 )
18. B&W Gradient map, opacity 50%
19. B&W Grunge texture, soft light, Opacity 70%
20. Levels layer ( 60 / 1.42 / 255 )
The picutre is now starting to take shape....
Now its time to give it some sparkle and unify the overal colour palet...
Eye enhancement...
21. Chopped out the pupils from eyes and dodged and burned to increase the contrast.
22. Hue / saturation attached to layer 21. Hue ~ 176, saturation ~ 25 to make eyes more blue.
22. Hue / saturation attached to layer 21. Hue ~ 176, saturation ~ 25 to make eyes more blue.
Unify the pallet...
Once the bulk of the editing is done I always like to add a few subtle colour layers to the whole picture to help unify the colour pallet.
23.B&W
grunge texture, model roughly masked out, opacity 33%, soft light. this
adds highlights to the background texture particularly around the edge
of the image, creating more depth. softlight, opacity 33%
24. B&W Gradient map, opacity 21%
25. Photo filter, deep blue, 18%
25. Photo filter, deep blue, 18%
Finishing touches...
A few little tricks to really make the image pop.
26. levels layer, 8 / 0.97 / 221 ~ incresing the overal contrast in the image
27. Very dark grey layer with center of image masked out by hand using big soft brush, Multiply, opacity 50% ~ to create a custom vignette.
Thats
it! I probably could have done this with slightly less layers here and
there, but this kind of image is always an exploration, lots of subtle
layers built up and settings played around with until the finished image
emerges.


Your article was featured in the Carnival of Creativity at http://www.thewritingreader.com/blog/2011/12/11/the-carnival-of-creativity-december-11-2011/ Thanks for submitting!
ReplyDeleteAwesome! thanks for letting me know liz ;) ~ Jamie
ReplyDelete